Tags Posts tagged with "recipe"

recipe

Bunny Butt Cake

(Culinary.net) Warmer days at the start of spring mean Easter is almost here, and the big bunny himself will be hopping around in no time delivering goodies.

This Easter, celebrate with your loved ones with a delicious and colorful Easter Bunny Butt Cake. It can bring smiles and laughter while putting everyone in a light, joyful mood.

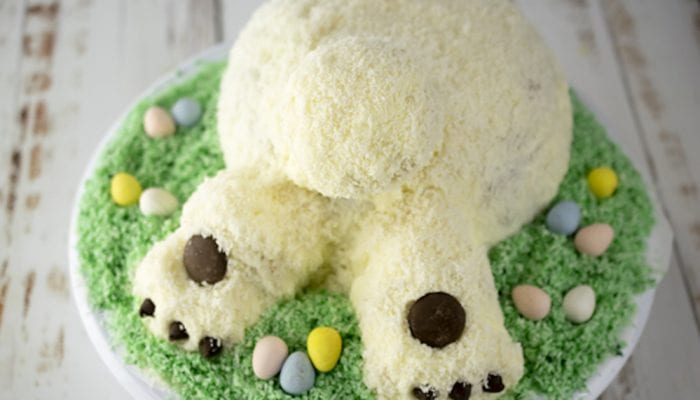
This cake is fun and bright with a fluffy, moist interior. Complete with chocolate candy eggs, shredded coconut and chocolate chips for little bunny toes, this recipe goes all out to paint a picture of the Easter bunny. This cake is worth every step. It’s delicious and as cute as can be, plus it’s perfect for dessert after a big Easter dinner.

Easter Bunny Butt Cake

Yield: Servings: 10-12

Ingredients

Nonstick cooking spray

2 eggs, plus 4 egg whites, at room temperature

3/4 cup cream of coconut

1/2 cup crushed pineapple, drained

2 teaspoons coconut extract

1 teaspoon vanilla extract

2 1/4 cups flour

1 cup sugar

2 teaspoons baking powder

1/2 teaspoon salt

12 tablespoons unsalted butter, at room temperature


Buttercream Frosting:

3  cups powdered sugar

2   sticks unsalted butter, softened

3   tablespoons milk

1   teaspoon vanilla extract

1/2  teaspoon coconut extract


4 thin pretzel sticks

1 bag (10 ounces) sweetened shredded coconut

8 drops green food coloring

2 large round chocolate candy melts

6 chocolate chips

mini candy-coated chocolate eggs, for garnish


Directions

Heat oven to 325 F.

Line muffin pan with four paper liners. Spray oven-safe glass bowl with nonstick cooking spray.

In large bowl, whisk eggs, egg whites, cream of coconut, pineapple, coconut extract and vanilla extract until combined.

In food processor, pulse flour, sugar, baking powder and salt until combined. Add 6 tablespoons butter. Pulse until combined. Add remaining butter. Pulse until coarse meal forms.

In large mixing bowl, add coarse flour butter meal. Add half of egg mixture. Beat 1-2 minutes. Add remaining egg mixture; beat until combined.

Fill each muffin cup 2/3 full. Bake 18-20 minutes, or until done. Cool completely.

Pour remaining batter into prepared oven-safe bowl. Bake 1 hour, 40 minutes, or until done. Cool completely.

To make buttercream frosting: In large bowl, add powdered sugar and butter; beat until fluffy. Add milk, vanilla extract and coconut extract; beat until creamy.

Turn bowl upside-down on cake stand until cake removes from bowl. If cake needs leveled, turn cake over and trim to flatten. Frost cake.

Remove wrappers from cupcakes. Using two pretzel sticks, press into base of cupcakes

and anchor to bottom rim of bowl cake to create bunny feet. Frost feet.

Take third cupcake and cut muffin top off. Cut muffin top in half. Using one pretzel stick, anchor one muffin top half at bottom of full cupcake to form toes. Repeat with second muffin top half for other foot. Frost toes.

Attach final cupcake with remaining pretzel stick to butt area of cake to make tail. Frost tail.

Apply 1 1/2 cups shredded coconut all over cake. Press chocolate candy melts into bottoms of bunny feet to resemble foot pads. Add chocolate chips to resemble pads for toes.

Place remaining coconut in plastic bag. Add green food coloring. Toss in bag until coconut is colored. Spread around base of cake for grass. Decorate grass with chocolate eggs.

Tips: Spoon flour into dry measuring cup and level off excess. Scooping directly from bag compacts flour, resulting in dry baked goods. Add 1 tablespoon additional milk if frosting is too stiff. Keep adding until desired consistency.

Sweet Potato Power Salad

By Heidi Sutton

Bright, beautiful spring days often call for fresh, delicious meals that give you energy to enjoy the great outdoors. Whether you’re hitting the pavement for a run, powering up for an afternoon at the office or picnicking with loved ones, nutrition and flavor can go hand in hand with an easy-to-make salad.

For your next springtime meal, lean on a versatile ingredient like sweet potatoes as a key ingredient in this Sweet Potato Power Salad, a light yet filling solution that can feed the whole family. Easy to add to a variety of recipes to enhance flavor and nutrition content, sweet potatoes can be used in sweet, savory, simple or elevated recipes. Plus, they can be prepared on the stove, baked, microwaved, grilled or slow cooked to fit your favorite dishes as a natural sweetener without added sugar.

According to the American Diabetes Association, sweet potatoes are a “diabetes superfood” because they’re rich in vitamins, minerals, antioxidants and fiber, all of which are good for overall health. They are also an ideal option for athletes before and after exercising with complex carbohydrates that provide sustained energy.

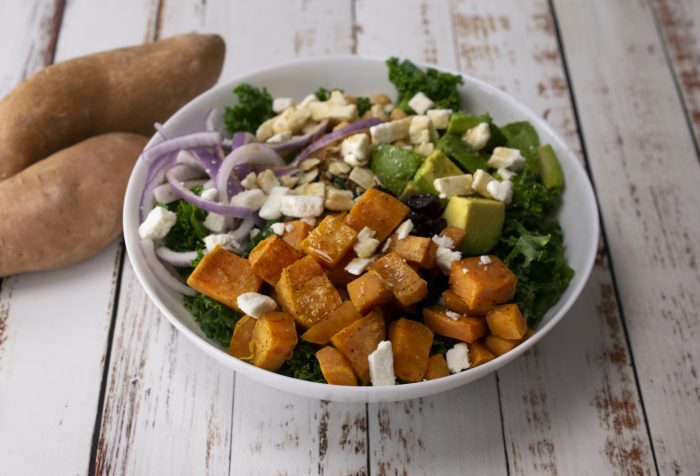
Sweet Potato Power Salad

Recipe courtesy of Carol Brown on behalf of the North Carolina Sweetpotato Commission

YIELD: Makes 6 servings

 INGREDIENTS: 

4 to 6 sweet potatoes, peeled and diced

2 teaspoons, plus 1 tablespoon, olive oil, divided

3/4 teaspoon salt, divided

1/4 teaspoon pepper

1 1/2 bunches curly kale, rinsed and chopped (7-8 cups)

1/2 large lemon, juice only

1 can (15 ounces) garbanzo beans, rinsed and drained

1 large avocado, pitted and diced

1/2 cup cranberries

1/2 cup coarsely chopped almonds

1/4 cup red onion, chopped

1/2 to 3/4 cup feta or goat cheese

Dressing:

2 tablespoons pure maple syrup

2 tablespoons olive oil

1/4 cup balsamic or white vinegar 

DIRECTIONS:

Preheat oven to 375 F. Place sweet potatoes in large bowl. In small bowl, lightly whisk 2 teaspoons olive oil, 1/2 teaspoon salt and pepper. Toss on sweet potatoes and place potatoes on large sheet pan. Bake 35 to 40 minutes until tender, flipping once during baking. 

Place chopped kale in large bowl. In small bowl, lightly whisk remaining olive oil, remaining salt and lemon juice. Pour over kale and mix for about 1 minute.

To make dressing: In bowl, whisk syrup, olive oil and vinegar.

In bowl with kale, add garbanzo beans, avocado, cranberries, almonds, red onion, sweet potatoes and cheese. Toss with salad dressing and serve. 

Note: Sweet potatoes can be baked and refrigerated 1 day in advance.

See video here.


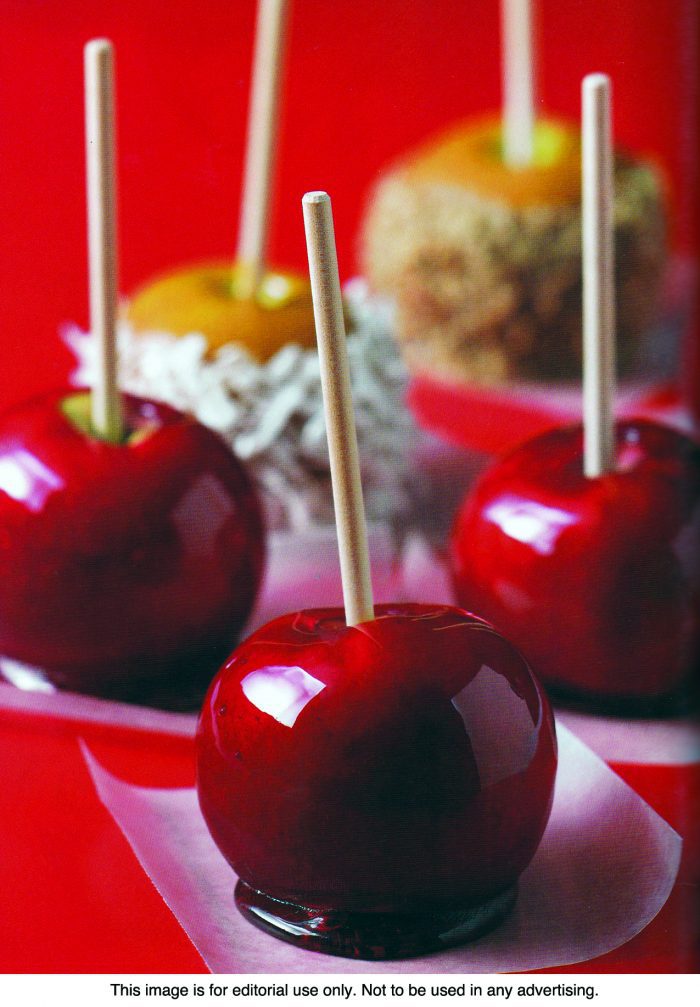
Halloween treats take center stage in October. And what can be better this time of year than a fresh autumn apple coated in a sweet candy shell?

Candied Apples

INGREDIENTS:

15 apples

2 cups white sugar

1 cup light corn syrup 1 1/2 cups water

8 drops red food coloring

DIRECTIONS:

Lightly grease cookie sheets and insert craft sticks into whole, stemmed apples. In a medium saucepan over medium-high heat, combine sugar, corn syrup and water. Heat to 300 to 310 F, or until a small amount of syrup dropped into cold water forms hard, brittle threads. Remove from heat and stir in food coloring. Holding the apple by its stick, dip in the syrup and turn to coat evenly. Place on prepared sheets to harden.

Old-Fashioned Caramel Apples

INGREDIENTS:

12 medium apples

2 cups granulates sugar

1 cup packed light brown sugar

2⁄3 cup light corn syrup

1⁄2 cup butter or margarine

1 cup half-and-half (10%) cream or evaporated milk

1 teaspoon salt

2 teaspoons vanilla extract

2 cups chopped pecans, 11⁄2 cups sweetened flaked coconut or 2 cups crisp rice cereal (optional)

DIRECTIONS:

Wash and dry the apples. Remove the stems. Insert a popsicle stick into the stem end of each apple, using a twist-like motion so that the apple will not split. Cover a large countertop area or a large baking sheet with waxed paper. In a large heavy kettle over medium-low heat, bring the granulated and brown sugars, corn syrup, butter, half-and-half and salt to a boil, stirring until the sugars dissolve and the mixture begins to boil. Cook, gently stirring to prevent scorching, to the firm ball stage (246 F). Stir in the vanilla. Remove from the heat. Cool until the mixture thickens slightly. 

Hold each apple by the wooden skewer and quickly twirl into the caramel, tilting the pan to cover the apple with caramel. Remove the apple from the caramel, allow the excess caramel to drip into the pan and then twirl the apple again to spread the caramel smoothly over the apple. Use a spoon to coat any part of the apple not covered with caramel. If desired, roll the coated apples in the toppings before the caramel sets. Place on the waxed paper until the coating is firm. Store in a cool place.

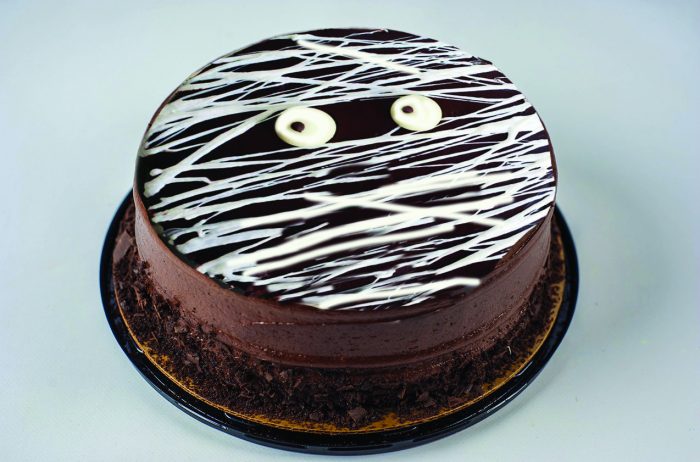
Black Magic Cake. Photo from METR)

Sweet treats are on display come Halloween. People hosting Halloween parties or bringing items over to others’ homes for the holiday may need to scare up some new ideas for dessert.

Chocolate never goes out of style and is right at home on Halloween. This recipe for “Black Magic Cake,” courtesy of The Food Network, is decadently rich. Don’t let all that chocolate frighten you. Drizzle as much melted marshmallow as necessary to brighten up the flavor. Turn into a mummy face or transform the top of the cake into a spiderweb instead.

Black Magic Cake

YIELD: 8 to 10 servings

INGREDIENTS:

2⁄3 cup vegetable oil, plus more for greasing the baking pans

1 cup Dutch-process cocoa powder (or any cocoa powder if on hand)

1 cup boiling water

2 cups granulated sugar

1 3⁄4 cups all-purpose flour (see cook’s note)

2  teaspoons baking powder

1   teaspoon fine salt

1  cup whole milk

2   large eggs

1  tablespoon pure vanilla extract

Filling and Frosting:

1 1⁄2  cups heavy cream

3⁄4  cup Dutch-process cocoa powder, sifted

8  ounces semisweet chocolate, chopped

1 teaspoon espresso powder

1 teaspoon pure vanilla extract

Pinch fine salt

2  tablespoons unsalted butter

1⁄3  cup confectioners’ sugar, sifted

Decoration:

2  cups mini marshmallows (about 4 ounces)

Cooking spray

1   or more candy spiders or two candy eyes for decorating

DIRECTIONS:

For the cake: Position an oven rack in the center of the oven and preheat to 350 F. Line the bottom of two 9-inch round cake pans with parchment and crease the parchment and the sides of the pans with oil.

Stir together the cocoa powder and boiling water in a small bowl and let sit to bloom for 5 minutes (this step intensifies the chocolate flavor in the cake).

Whisk together the granulated sugar, flour, baking powder and salt in a large bowl. Whisk together the bloomed cocoa, oil, milk, eggs, and vanilla in a medium bowl. Pour the cocoa mixture into the sugar mixture and stir until smooth (the batter will be thin). Divide the batter evenly between the prepared cake pans. Bake until the cakes bounce back when pressed in the middle and a toothpick inserted in the center comes out clean, 30 to 40 minutes. Let cool completely in the pans on a rack.

For the filling and frosting: Heat the cream in a double boiler over low heat, whisking occasionally, until it begins to steam. Whisk in the cocoa powder, chocolate, espresso powder, vanilla, and salt until the mixture is smooth, about 2 minutes. Whisk in the butter until melted. Whisk in the confectioners’ sugar until incorporated. Let the frosting cool completely.

To assemble: Put one cake, bottom-side up, on a serving plate or cake stand. Spread about 1 cup of the frosting over the top but not all the way down the side. Top with the other cake, bottom-side up, and frost the top and sides with the remaining frosting.

For the spider web or mummy decoration: Microwave the marshmallows in a microwave-safe medium bowl until they swell and are soft enough to stir, about 1 minute. Let sit a few minutes until cool enough to touch. Spray your hands with cooking spray. For a spider web, pick up a tablespoon-sized blob of the melted marshmallow and stretch it over and around the cake; repeat so that the strings of marshmallow crisscross one another in many directions. Continue until you have what looks like a spiderweb. For a mummy, stretch the marshmallow so that all the strings on the top of the cake run in the same direction, leaving a small gap between strings for the mummy’s eyes to peak out. Garnish with a candy spider or several candy spiders for the web cake or candy eyes for the mummy cake.

Cook’s note: The candy directions are a nice touch, but the cake will be fun and delicious without them as well. When measuring flour, spoon it into a dry measuring cup and level off the excess.

Semi-homemade tip: Purchase a premade chocolate cake and use the decoration to make the mummy or spiderweb only.

METRO photo

Mother’s Day is a great time of year to honor mothers and attempt to give back just a portion of the tireless love and devotion moms offer their children. For those needing a little inspiration on treating their mothers in special ways, consider these ideas.  

• Make mom a breakfast in bed with her favorite morning treats or bake a delicious dessert that mom will absolutely devour.

• Enjoy a movie at home with mom. Let her pick the flick and share her favorite film with you.

• Agree to not bicker for the entire day, especially if you are prone to getting into arguments with siblings.

• Put together a collage of photos from moments you have shared with your family.

• Cook a meal together and learn about everyone’s favorite recipes or the family history.

• Customize a coffee mug, tote bag or a blanket with a meaningful sentiment or photo.

• Treat mom to a day off from her chores. Tackle all of the jobs she normally does for the family. 

• Pamper mom with a gift card for her favorite nail salon or massage therapy location.

• Compile a playlist of songs and artists mom prefers and download them to her phone.

• Write her an email with an inspirational quote or special words of love.

• Tackle a task that she may not want to do herself, such as washing the exterior of her car and vacuuming the interior.

Mother’s Day gift ideas should come from the heart and can show mothers near and far how much they are appreciated and loved.


Dancing leprechauns, pots of gold, corned beef and cabbage, green beer, parades, and the wearing of the green are all synonymous with St. Patrick’s Day. But perhaps the most iconic symbol of all is the shamrock, the ubiquitous three-leafed plant that makes an appearance in a myriad of ways – it’s said to bring good luck.

In honor of the day and to start a new tradition to be enjoyed after the corned beef and green beer, the Wilton Test Kitchen created a Lucky Giant Shamrock Cookie that’s easy to bake and decorate. It’s the perfect way to add fun, color and sweetness to a St. Paddy’s party; there’s plenty to serve a crowd. Plus, kids and adults alike will enjoy this colorful cookie.

The delicious butter cookie dough with a hint of almond is baked in a shamrock-shaped pan. To decorate, start with white ready-to-use decorator icing in a can (no special skills required). Use part of it to ice the background and sides of the shamrock. Tint a portion green and ice the shamrock shape on top of the cookie, then add green candy-coated chocolates to outline the edges. The message is written with the remaining white icing.

Visit www.wilton.com for additional ideas for St. Patrick’s Day, and for celebrations of all kinds.

Lucky Giant Shamrock Cookie

YIELD: Makes about 15 servings

INGREDIENTS:

  • 2 3/4 cups all-purpose flour
  • 1 teaspoon baking powder
  • 1 teaspoon salt
  • 1 cup (2 sticks) butter, softened
  • 1 1/2 cups granulated sugar
  • 1 egg
  • 1 1/2 teaspoons vanilla extract
  • 1/2 teaspoon almond extract
  • 2 cans (16 ounces each) White Ready-To-Use Decorator Icing
  • Kelly Green Icing Color
  • Light corn syrup
  • Green candy-coated chocolates

DIRECTIONS:

  1. Preheat oven to 375°F.
  2. In medium bowl, combine flour, baking powder and salt. In large bowl, beat butter and sugar with electric mixer until light and fluffy; beat in egg and extracts. Add flour mixture to butter mixture 1 cup at a time, mixing after each addition. Do not chill dough. Press into bottom of ungreased Shamrock Pan.
  3. Bake 20-25 minutes or until edges of cookie are lightly browned. Cool in pan 10 minutes. Remove from pan and cool completely. Place cooled cookie on foil-wrapped cake board or large serving platter.
  4. Tint 2 cups icing green; thin with corn syrup. Reserve 1/4 cup white icing; thin remaining white icing with corn syrup. Use spatula to ice sides and background areas with thinned white icing. Spatula ice shamrock on top of cookie with green icing. Position candy on edges of shamrock. Using Tip 4, print message with reserved 1/4 cup white icing.

Convenience Tip: Substitute 2 packages (18 ounces each) refrigerated cookie dough for cookie recipe above.

Source: Wilton Enterprises

A Sweet Sauce to Savor

(Culinary.net) There are few things better than festive holiday celebrations. Everyone is gathered around the table, ready to eat and enjoy the company. The atmosphere is joyful, the decorations are beautiful and the food is absolute perfection.

From warm casseroles to hearty proteins, most spreads are made of an array of colors with mouthwatering sides and desserts. However, there are some dishes the holidays just can’t happen without. One is a classic, traditional Sweet Cranberry Sauce. It’s popping with color and texture. Plus, it makes everything it tops taste just a little bit better.

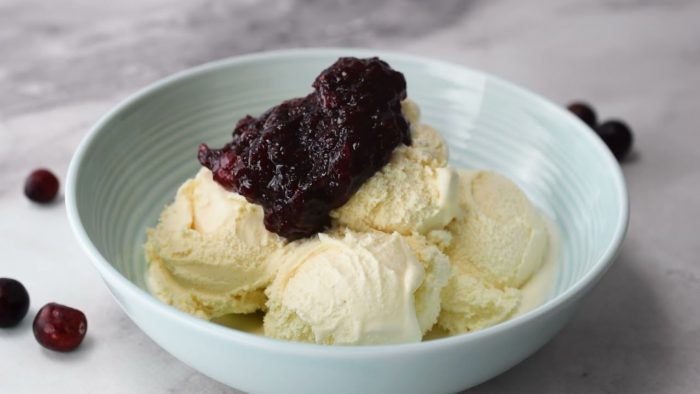
This sauce is perfect for nearly any holiday celebration but is also a sweet treat that can be served over vanilla ice cream for dessert. It’s fruity with a hint of citrus and flavorful with a dash of ground cinnamon and a bit of ginger.

This recipe works well into the holiday season. It’s a timeless dish but with a fresh and tangy twist that’s perfect for both gatherings with many guests or simple nights at home with those leftovers you just can’t resist.

Find more recipes perfect for celebrating the holidays at Culinary.net.

If you made this recipe at home, use #MyCulinaryConnection on your favorite social network to share your work.

Sweet Cranberry Sauce

Prep time: 2 minutes

Cook time: 10 minutes

Servings: 8

Ingredients:

12 ounces cranberries

1 cup granulated sugar

1/4 cup orange juice

1/2 cup water

1 1/2 tablespoons ginger paste

1/8 tablespoon salt

1/4 teaspoon ground cinnamon

2 tablespoons orange zest

vanilla ice cream (optional)

Directions:

In large skillet over medium heat, combine cranberries, sugar, orange juice, water, ginger paste, salt, ground cinnamon and orange zest.

Bring to simmer. Stir until thickened to desired consistency, 15 minutes.

Cool 30 minutes. Transfer to bowl. Cover and refrigerate 30 minutes. Serve alone or over vanilla ice cream, if desired.

Watch video here.

Hot mulled apple cider

When hosting friends and family at home, it’s understandable that hosts direct so much of their focus to the foods they plan to serve. The main course is often the focal point and most memorable aspect of a dinner party, and that’s true whether the get-together is a backyard barbecue, a holiday meal with the family or a formal affair with colleagues.

Food might be a focal point, but guests also will need something to drink. Traditional spirits like wine and cocktails are the standard, but hosts who want to get a little creative should not hesitate to do so. When choosing a special beverage, timing is everything. Guests will want to cool down on warm summer evenings, so something cold and refreshing can make for the perfect signature cocktail. When hosting on nights when the mercury has dropped, a warm beverage can heat up guests in a matter of minutes. On such nights, hosts can serve this version of “Hot Mulled (Sherried) Apple Cider” courtesy of Laurey Masterton’s “The Fresh Honey Cookbook” (Storey). One added benefit to Masterton’s recipe is it can produce a welcoming winter aroma, helping hosts establish a warm ambiance for the festivities.

Hot Mulled Apple Cider

YIELD:  Serves 16

INGREDIENTS:

1 gallon apple cider

1 orange, unpeeled, cut into slices

1⁄4 cup whole cloves

4 sticks cinnamon

1⁄4 cup honey

1 cup sherry (optional)

DIRECTIONS:

Combine the cider, orange slices, cloves, cinnamon, and honey in a large pot over medium heat. If you are picky about things floating in your cider, make a little bundle out of cheesecloth and place the cinnamon and cloves inside before adding to the cider. I like to chew on cloves, so I just toss everything in. Bring to a boil, and then reduce to a simmer over low heat for an hour or so to spread these lovely winter aromas around your home. If you’re serving it to adults, add the sherry. It might make everyone want to go sledding!

METRO photo

Carving jack-o’-lanterns is a Halloween tradition that both adults and children enjoy. It’s hard to resist an opportunity to carve a funny or scary face into a pumpkin that will soon make its way to the front porch, but there’s another irresistible element to carving pumpkins as well.

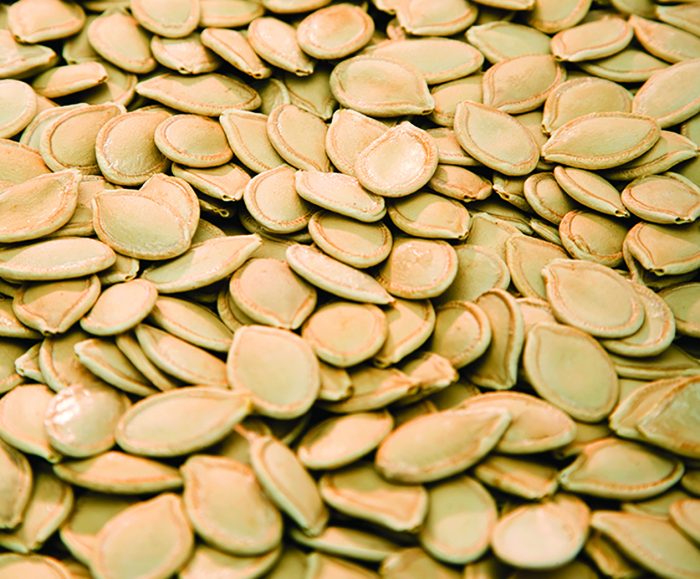
Roasted pumpkin seeds make for a tasty, tempting treat. Seeds must be removed before carving pumpkins, so turning them into a savory snack is a great way to make use of them and cook up some fuel for family carving sessions. Roasting pumpkin seeds is a straightforward process, though some people may have their own techniques to make seeds more flavorful.

The following recipe for Roasted Pumpkin Seeds from the Food Network reflects various ways to prepare this beloved snack, ensuring that people with varying tastes can no doubt find a way to incorporate their favorite flavors into this Halloween staple.

Roasted Pumpkin Seeds

1. Seed the pumpkin: Preheat the oven to 300 degrees F. Using a spoon, scrape the pulp and seeds out of your pumpkin into a bowl.

2. Clean the seeds: Separate the seeds from the stringy pulp, rinse the seeds in a colander under cold water, then shake dry. Don’t blot with paper towels; the seeds will stick.

3. Dry them: Spread the seeds in a single layer on an oiled baking sheet and roast 30 minutes to dry them out.

4. Add spices: Toss the seeds with olive oil, salt and your choice of spices (see below). Return to the oven and bake until crisp and golden, about 20 more minutes.

5. Sweet Toss with cinnamon and sugar (do not use salt in step 4).

6. Indian Toss with garam masala; mix with currants after roasting.

7. Spanish Toss with smoked paprika; mix with slivered almonds after roasting.

8. Italian Toss with grated parmesan and dried oregano.

9. Barbecue Toss with brown sugar, chipotle chile powder and ground cumin.


by -
0 556
Tart Lime Smoothie

A Luscious Lime Smoothie for Hot Summer Days

(Culinary.net) During summer months, it’s common for many people to want to spend as much time outside enjoying the weather as possible. From the minute they wake up to when the sun goes down (and beyond), nearly everyone wants to take advantage of the warm summer heat. Especially kids, who often want to enjoy their break from school for the year.

From beach towels and sunglasses to swimsuits and flip flops, almost everything you need to enjoy some fun in the sun is likely already on-hand. However, summer can be so much sweeter with a fresh and fruity drink in your hand. Made with fresh ingredients, this drink is a perfect addition to any poolside party.

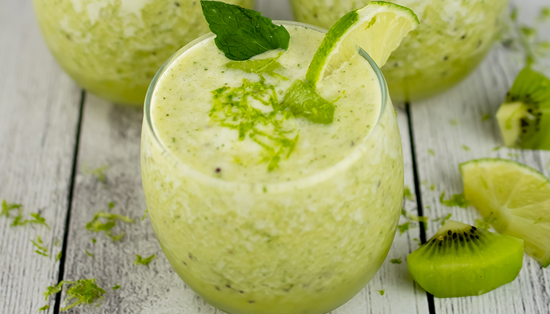
Next time you are looking to relax outdoors all day, try this Tart Lime Smoothie, which is filled with fresh fruit and cool enough to wash away that summer warmth. This chilled, tart drink will have everyone in the family ready to go for round two down the water slide.

Light, fresh and a little bit frothy, this smoothie has a unique texture that may leave you wishing for a second cup the moment you take your first sip. Find more fun summer recipes at Culinary.net.

If you made this recipe at home, use #MyCulinaryConnection on your favorite social network to share your work.

Tart Lime Smoothie

Yield: 1 1/2 cups

Ingredients:

2 kiwis, peeled and halved

2 ripe bananas

3 tablespoons fresh mint, chopped

2 limes, juice only

1 cup orange juice

2 cups ice, crushed

Directions:

In blender, blend kiwis, bananas, mint, lime juice, orange juice and ice until smooth.

Pour into glasses to serve.


See video of recipe here.